Ok here I'll just give a tutorial for you all who have problems like the above. Note: Safe software for mobile phone and does not eliminate the warranty.
Foremost you have to prepare applications and FreeSigner HelloOX, you can download below for those who do not have both.
To get Cer and Key I suggest through this arena OPDA famous site fast in serving the certificate request.
1. After entering the site OPDA, you go directly to register for a not yet have an account.

2. Please register and fill out the empty columns.

3. After successful registration, login now and then immediately go to my certificate,
4. Click Apply to request cer and key

5. Enter your request including your IMEI number, how to know the IMEI number, type * # 06 # on your smartphone.

6. Done. Cer and Key hape you have been so special. now live download Cer and Key in the rightmost column as shown below.

If KUALA LUMPUR and Key can not download, then wait for about 2 hours, then went to the site OPDA again, then login and then to MY CERTIFICATE Download as step 6.
Ok, now entering the stage through the Free Phone Hacking Signer. (Create a new folder on the memory card with the name "Asigned")
1. Signer free install as usual. Once inside select "Options" and then setting

2. Enter "KUALA LUMPUR" which was downloaded to the box "Sign Cert"
3. Enter "Key" that was downloaded to the box "Sign Key". In directiry output change to "Custom" and change it to Custom directiry "Asigned" (folders that we created earlier) Asigned point directory that is when an application that we have hacked (unsigned applications to be signed) is in the directory, for easy file search .


4. Now we will install the application HelloOX. Open freesigner then "Add Task" enter HelloOX files already stored on your phone.

5. After HelloOX on add, select "Options" then "Go!"
6. Done. Eitzz ..... but this is done in stages mengUnsigned HelloOX file. Continue ......
7. Now open the folder "Asigned" and install HelloOX which has been Signed.
8. Once installed open HelloOX and Hack process ensued. It takes a few minutes, after finished, Exit from HelloOX.
9. Now open ROMPatcher +. ROMPather already exists automatically when the process is complete Hack.
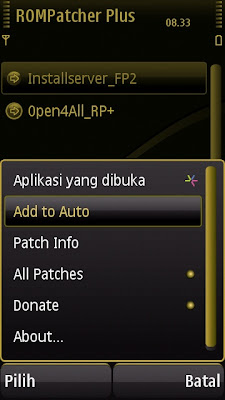
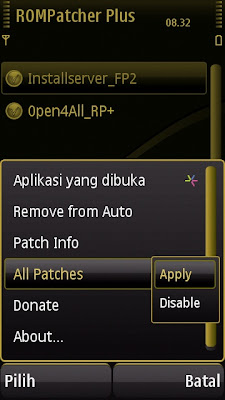
10. Now the "Options" select "add to Auto". gituin both yes. Then "Options" again "All Patches-Apply".


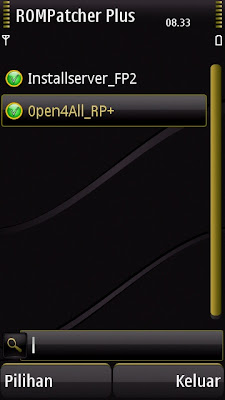
So the picture as below

Huahmm ......... So then, congratulations your phone is in hack
